SpringBoot Exception 처리
!-- en -->
SpringBoot Exception Handling
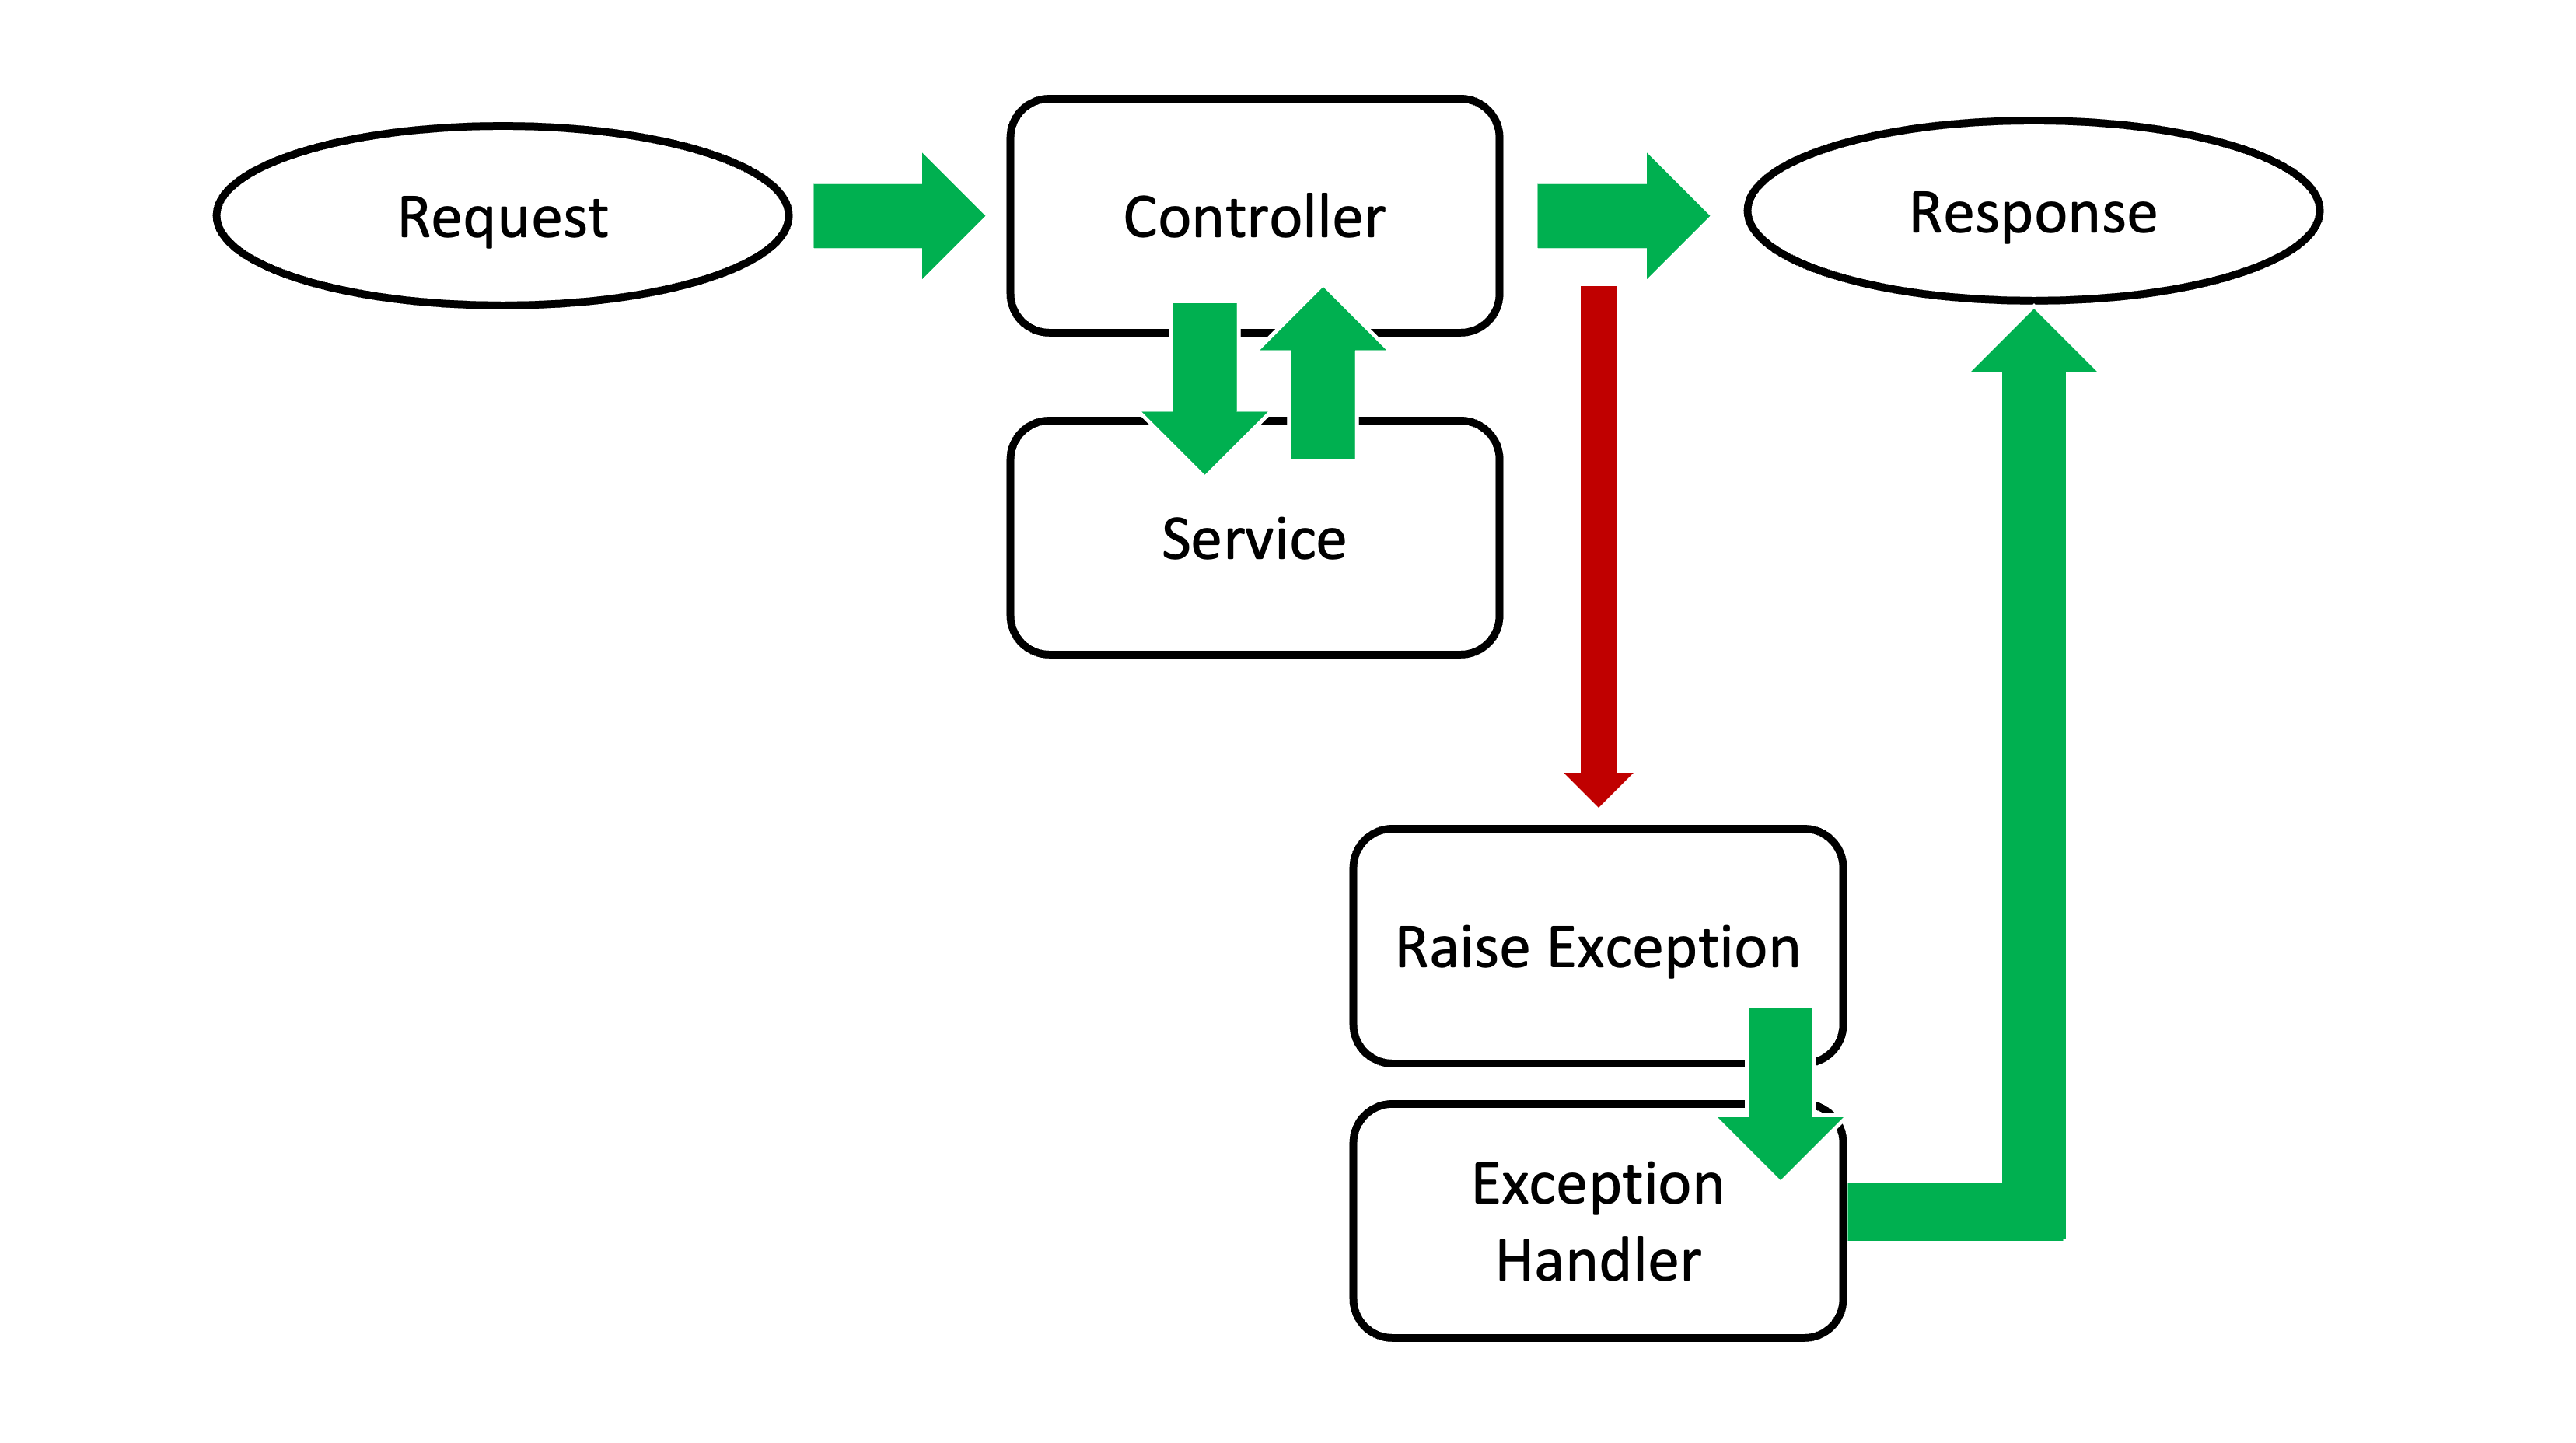
웹에서 에러가 발생했을 경우에는 크게 세가지 정도로 작업이 될 수 있다.
- 에러페이지
- HTTP Status 4XX 에러, 5XX 에러
- HTTP 200 + Error Message
Exception을 처리하는 것은 이미 SpringBoot에 준비가되어있다.
관련된 어노테션을 확인 해 보고 어떻게 적용을 할 것인지 살펴보자
!-- en --> When an error occurs on the web, it can generally be handled in three ways:
- Error page
- HTTP Status 4XX errors, 5XX errors
- HTTP 200 + Error Message
Exception handling is already built into SpringBoot.
Let's look at the related annotations and see how to apply them.
@ControllerAdvice / @RestControllerAdvice
페이지를 보여주는 기능을 처리하는 View Resolver에 사용 할 수 있다. 즉, WhiteLabel Page라던지 에러가 났을 경우 보여주는 화면에 대한 처리에 적용 할 수 있는 어노테이션이다
!-- en --> This can be used with the View Resolver that handles page rendering functionality. In other words, it's an annotation that can be applied to handle the display of screens when errors occur, such as the WhiteLabel Page.
@ExceptionHandler
특정 Controller에 적용시키면, 모든 에러가 그쪽으로 Catch될 수 있는 처리를 해 주는 기능이다
위의 @Advice와 @ExceptionHandler를 사용해서 Exception을 처리 해 보도록 하자
!-- en --> When applied to a specific Controller, this feature allows all errors to be caught and handled there.
Let's use the @Advice and @ExceptionHandler mentioned above to handle Exceptions.
Exception 처리 준비하기
Controller, Dto 준비하기
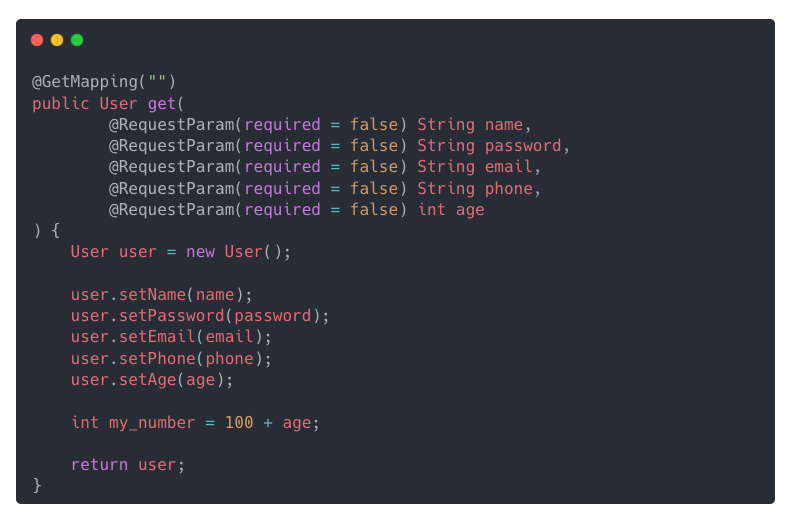
Exception 처리를 위해 Exception이 일어날만한 Controller를 생성 해 보자
!-- en -->
Preparing for Exception Handling
Preparing Controller and Dto
Let's create a Controller where Exceptions might occur for Exception handling.
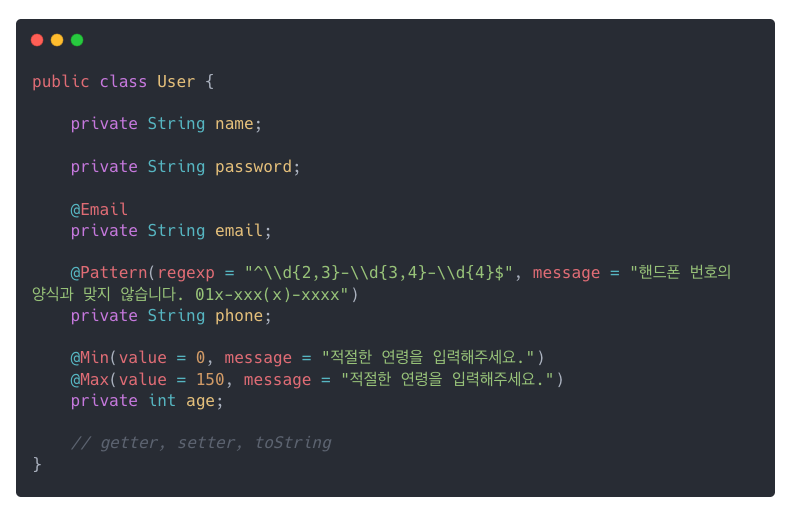
위의 컨트롤러는 User Dto를 사용하고있다. User Dto는 아래와 같이 만들었다
!-- en -->
The controller above uses User Dto. The User Dto was created as follows:
준비가 완료되었으니, Exception이 일어날 만 한 경우를 생각 해 보고 Exception들을 처리 해 줄 패키지를 만들어보자
GET Mapping이 되어있는 주소에는 requestParam으로 name, password, email, phone, age 를 받아주고 있다. 각각 required 옵션이 false로 되어있기 때문에 데이터를 보내지 않아도 큰 무리가 없겠지만, 맨 밑에 있는 int my_number = 100 + age; 라는 코드는 age가 Null이라면 Exception이 날 수 있다. 이런 상황을 가정하고, Exception Handler를 작성 해 보고자 한다.
!-- en --> Now that we're ready, let's think about cases where Exceptions might occur and create a package to handle those Exceptions.
The GET Mapped address receives name, password, email, phone, age as requestParams. Since each has the required option set to false, there's no major issue if data isn't sent. However, the code int my_number = 100 + age; at the bottom can throw an Exception if age is Null. Assuming this scenario, let's write an Exception Handler.
Exception Class 만들기 - @Advice 사용하기
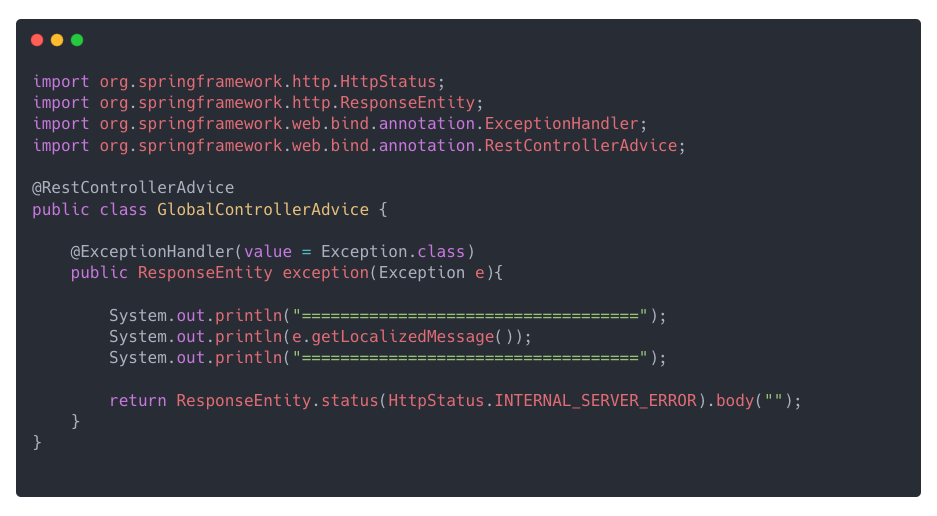
@Advice 어노테이션이 붙은 클래스는, Exception이 나는 모든경우에 거쳐간다. 그래서 나는 Exception들을 다루기 위해 따로 클래스로 빼두었고, 나중에는 각각 프로젝트 도메인별로 적용하면 될 것 같다.
!-- en -->
Creating Exception Class - Using @Advice
Classes annotated with @Advice are passed through whenever any Exception occurs. So I separated them into a dedicated class to handle Exceptions, and later they can be applied to each project domain.
- REST API에 맞게,
@RestControllerAdvice를 사용했고,@ExceptionHandler를 적용하여 Exception을 받을 객체라는것을 명시했다 - 함수 인자로 Exception을 받아 해당하는 Exception 처리를 다룰 수 있도록 했다.
위의 코드는 모든 Excpetion에 대해 처리 해 줄 수 있는 Exception.class 를 값으로 가지고있다. 관련된 Exception인지 출력 해 보려면 e.getClass().getName() 을 출력해보면 현재의 Exception이 어떤 Exception인지 알 수 있어서 해당하는 내역에 따라 따로 처리 해 줄 수 있다.
현재 RequestParam과 관련되어서 Method Argument와 관련된 에러이므로 해당하는 에러를 따로 처리 해 보도록 하자
!-- en -->
- For REST API compatibility, I used
@RestControllerAdviceand applied@ExceptionHandlerto indicate that this object will receive Exceptions. - The function receives Exception as an argument to handle the corresponding Exception processing.
The code above has Exception.class as its value, which can handle all Exceptions. To check what type of Exception it is, you can print e.getClass().getName() to see the current Exception type, allowing you to handle it separately according to the details.
Since the current error is related to Method Arguments due to RequestParam, let's handle this error separately.
Exception Class 만들기 - Argument Exception
@ExceptionHandler(value = Exception.class) 를 좀 더 세분화해서 만들어 보려고 한다.
위에서 말했듯이, Method Argument와 관련된 기능들을 사용 할 것 이기 때문에 맞는 기능을 찾아 적용 해 주자
!-- en -->
Creating Exception Class - Argument Exception
I'm going to make @ExceptionHandler(value = Exception.class) more granular.
As mentioned above, since we'll be using features related to Method Arguments, let's find and apply the appropriate functionality.
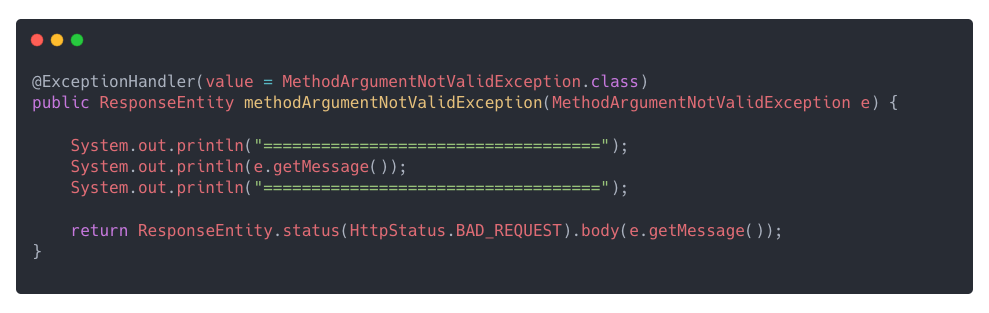
Exception 함수의 인자가 Exception.class 에서, MethodArgumentNotValidException.class 으로 바뀌었다.
모든 Exception 이름을 외울 수는 없지만, 위에서 출력한 e.getClass().getName() 으로 해당하는 Exception의 이름을 알 수 있고, 공통으로 처리해도 되고 방금처럼 따로 만들어서 처리해도 된다.
!-- en -->
The Exception function's argument changed from Exception.class to MethodArgumentNotValidException.class.
You can't memorize all Exception names, but you can find the Exception name using e.getClass().getName() as shown above, and you can either handle them commonly or create separate handlers like we just did.